. Ballerina Ponies . Brush n' Grow Ponies . Dance n' Prance Ponies .
. Dream Beauties: Discoloration, Re-Hairing, Repair .
. Eyelash Princess Ponies . Flutter Wings .
. Hair Do Ponies . Happy Tails Ponies .
. My Pretty Pony . Peek a Boo Babies . Plushies . Scents/Odors .
Brush n' Grow Ponies
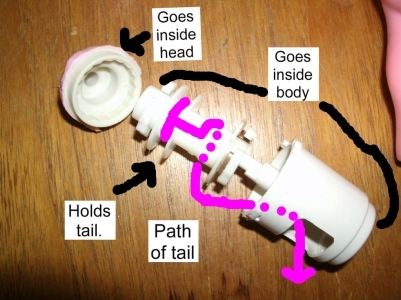
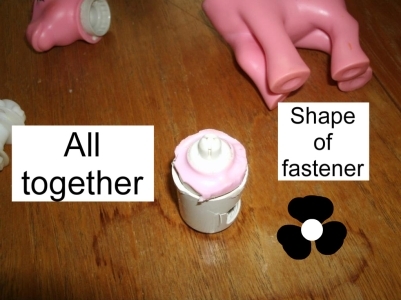
"I've cut all of the pieces out and this is how they go back together...
This part is moulded in at the neck and the hole is for the tail to go out.
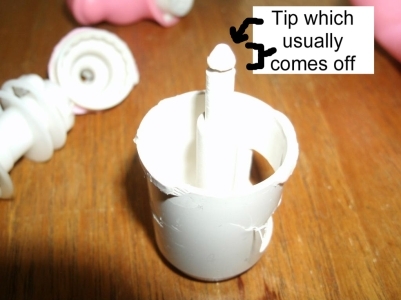
Showing the shape of the hole in the head piece - the three prongs are pretty solid and you have to be able to push the pin through the hole to put the head back. It's also very well molded onto the head so you have to cut right the way around watching out for the uneven shape.
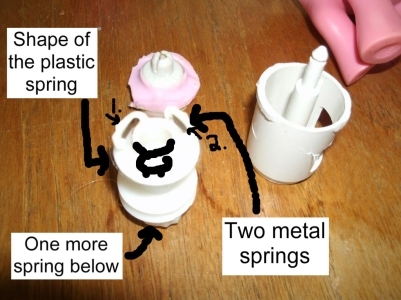
Showing the position of the metal springs, they lie inside the plastic springs at the top and bottom and there's a sheet of plastic between them and the rest of the mechanism. The top is the same shape as the bottom with three springs."
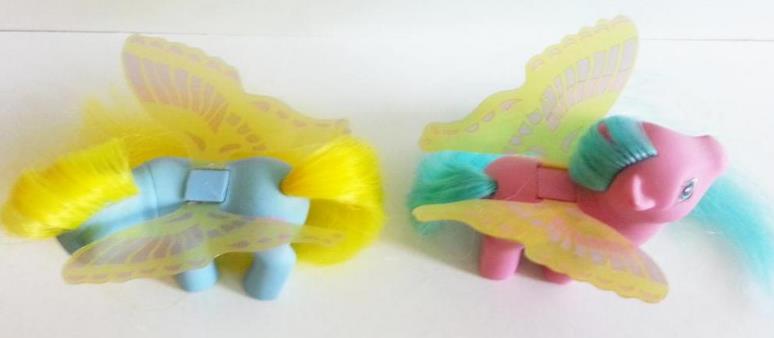
Flutter Wings
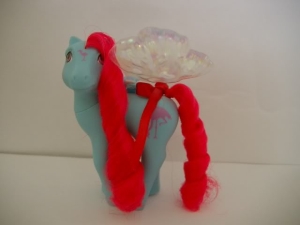
There have been various pony collectors who sell reproduction flutter wings that are nearly identical to the originals. See Resources for where you can find out who is currently making them.
In these photos, courtesy BabySnuzzle, RoseDust has her original flutter wings, and Tropical Breeze has reproductions.
RedKitsune at the MLP Arena offers a nice tutorial for making replacement flutter wings that look a lot like the originals: How to Make Flutter Wings Tutorial. (SkyLocket on DeviantArt)
Here's a great tutorial on how to make flutter wings out of plastic 2 liter bottles: Little Pony Heaven Flutter Wing Tutorial. They don't look like the ponies' original wings, but are super cute.
Hair Do Ponies
This photos, courtesy Tori Y., shows their inner workings.
My Pretty Pony
Repair
Internal workings of Pretty Pony (and how to fix them), tutorial and photos courtesy BarbedDragon.
"She was pried apart as carefully as possible with some metal clay tools (Flat head screwdriver would have worked too, just didn't have one)
SO here's what she looks like inside.....(children avert your eyes).
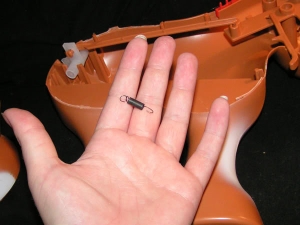
Here's that pesky little spring which you can see attached correctly in the first/last pics.
The other thing to fix them (Both ears wiggle, one eye blinks, and the tail swishes) is when you put them back together make sure you place the ear PADDLES back in bewteen the paddle tines---Like so---on both sides. Its harder than it looks believe me.
Plushies
How I wash my Vintage Plush! 🐶✨
How to Fix Stuffed Animal Fur from Dryer Damage and More!
Cleaning
One of the simplest methods for cleaning plushie ponies of all generations and hair types is to wrap them in a pillow slip, tie the pillow slip closed, and run them through the washing machine. The pillow slip helps prevent their eyes from scratching and keeps them from getting beat up in the washer. Set your machine to the gentle cycle, use any brand of laundry detergent, and warm water. Both hot and cold water can set stains. Lay them out to dry. This will probably take awhile as they are thick. It may be best not to put them in the dryer as there are reports of the heat frizzing and melting their hair.
Wash their hair as needed with any shampoo and conditioner of your choice. The same that works well on regular ponies is fine for plushies
Scents & Odors
Scents
For ponies of all generations who's bodies are scented, but the scent has faded, try leaving them in a ziplock bag for an extended period of time. This will often bring the scent back. Be careful not to leave the G1 Sweetberry and Sundae Best ponies in the bag for too long, as the chemicals used to make them smell sometimes turns their hair an ugly brownish green.
Smoke & Unpleasant Odors
Your basic cleaning techniques, especially an OxiClean bath, may get rid of odors attached to a pony. For stronger smells, wrap the pony in gauze and place it in a plastic container with charcoal briquettes. Cover the container and place it in a warm area. Replace the charcoal as needed until the smell is gone. Twin Pines of Maine carries a D-Stinker spray specifically designed for use with dolls.
Windy Wings & Summer Wings
Various sellers make replacement wings for wingers. See Resources for where you can find out who currently has them available.
Cleaning
You can clean the inside of the battery compartment using Q-tips and rubbing alcohol.
Photo courtesy Wysteria_UK.
Sweet Talkin' Ponies
Cleaning
MPP's are made different materials than MLP's, so not all the same restoration techniques can be used on them. Magic Erasers usually remove marks and scuffs safely. Use q-tips or toothpicks to clean the hard to reach parts of the eyes. A heavy conditioning and application of a flat iron often makes their hair look almost new.
Photos courtesy EmBee.
Photos courtesy WickedWonderland.
A Decorating Starcatcher that has turned a blotchy pink can be fixed with acetone and a lot of scrubbing. This removes the color changing layer, so the pony will remain white. Photo courtesy MyLittleLofty.
Here are some photos of their construction. Baby photos via ABCWinter at the MLP Trading Post. Adult photo courtesy KottonKandy.


Miscellaneous
Hope that helps anyone that wants to fix theirs, tho I do recommend to be prepared to fix cracks and fractures, or know how to sculpt/repair them. Its easier if they are a little warm, but sometimes that makes the plastic tear easier (not a good thing) so be careful!!!"

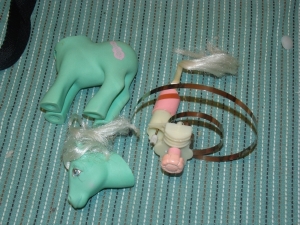
The tail hair loop goes between the white hair tines.
No information on how to fix these yet, but here are photos of how they look with broken mechanisms (loose wires) and intact mechanisms (tightly coiled wires). Here's a YouTube video about: How to Re-tail a Dance n Prance Pony. Photos courtesy Heftysmurf76.
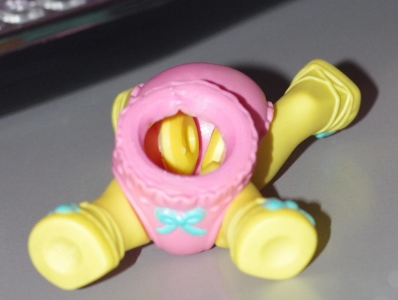
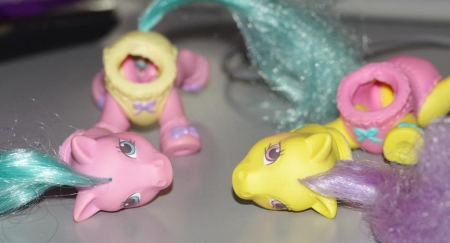
Peek a Boo Babies
Here is a tutorial about how to remove the heads and reassemble Peek a Boo Babies.
ColorGlow received a more extensive restoration:
Rehaired completely with matching dollyhair colors
Filed out dents in legs from scratches
Repainted legs & eye shadow to eliminate scuffs
Repainted symbol with metallic paint to cure scuffs
Cast new symbol out of sculpey & painted & glued toreplace NDS symbol
Sanded down top layer of skin to remove discoloration
Polished skin to restore smoothness after sandingUsed thread wrapped around 'hinge stem' on loose symbol to restore turning action without floppiness
Dance n' Prance Ponies
Takara Ponies
I doubt anyone knows much about cleaning these guys, but this brave soul found out that their noses pop off easily if you do need to work on one.
Photos courtesy Jodi R.
Re-Hairing
Here's a tutorial courtesy Chrissytree that shows how the mechanism inside a Brush n' Grow pony works. Also check out: Re-Pairing a Brush 'n' Grow Pony.
To re-hair a Dream Beauty, start by cutting the hair as short as you can. Then push what's left into the slot for the mane and the hole for the tail.
Separate your replacement hair into plugs and tie them with thread. I 've found embroidery thread to be a good thickness for this.
Fill the mane slot and tail hole with glue and then push the plugs of hair in one at a time. The tail can be pushed in as one large plug.
Style once the glue is dry.
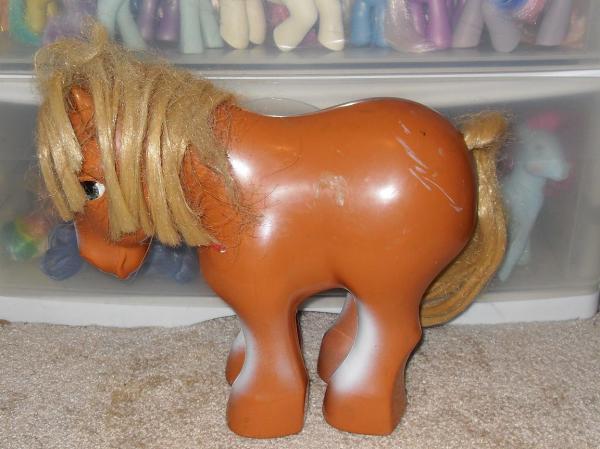
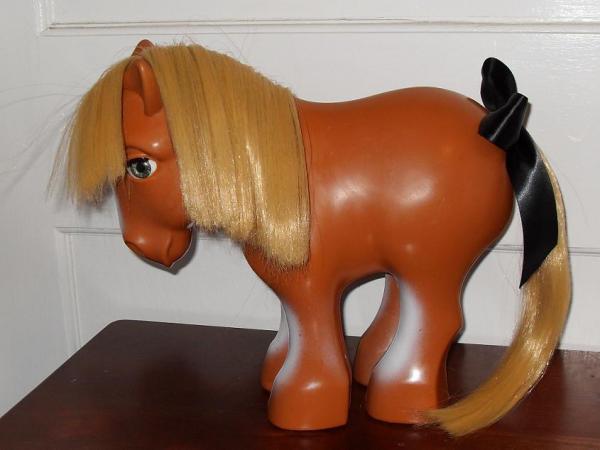
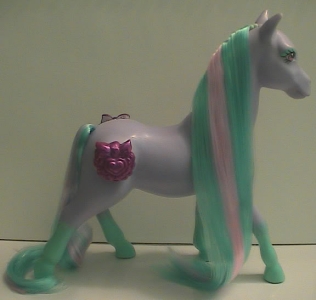
Discoloration
To correct discoloration on a Dream Beauty, cover the area you want to protect from fading then paint the yellowed areas with Salon 40 Creme Developer. Leave the horse in the sun and reapply the cream until you've achieved your desired results.
Repair
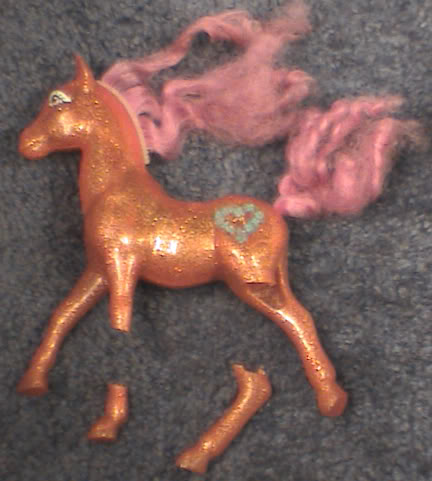
Dream Beauties can often be repaired using the same techinques as for plastic accessories. Photos courtesy WingsofMasquerade. This StarDazzle was repaired with glue.
Repair
You'll have to get really creative for this to work, but if replacing your pony's batteries doesn't fix her, you can try replacing the speakers and various components that make up the sound mechanism. Try searching electronics stores and specialty toy stores for parts. Some electronics stores might be willing to fix it for you.
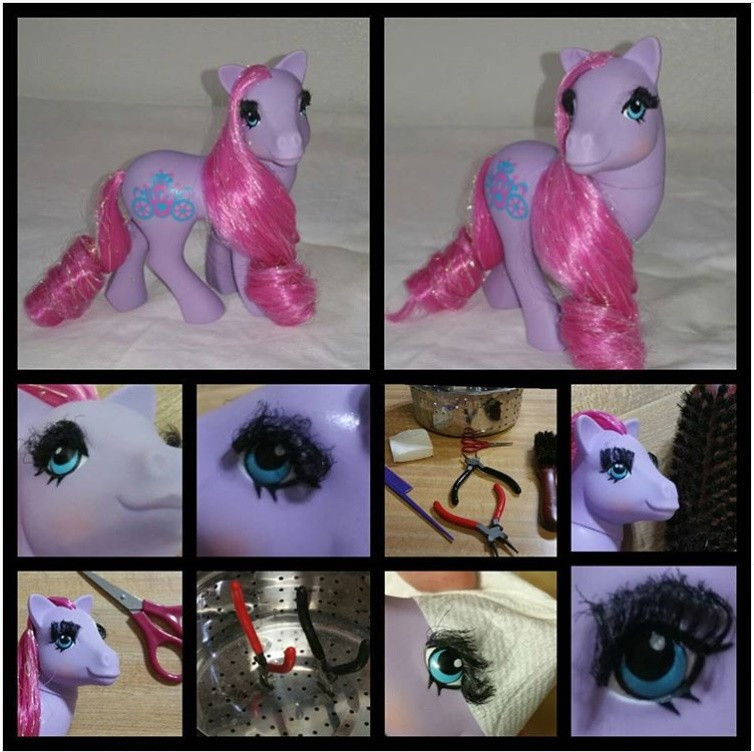
Eyelash Princess Ponies
The eyelashes on this set can be trimmed and styled to lay nicely. Photos and tutorial courtesy Melissa M.
then
or
Happy Tails Ponies
Photo and information courtesy AnnoMundi.
"You remove the head and then bend out the whole thing inside her. Then you can remove the "tail ring" which makes it easier to clean the whole tail."
Hand washed Glory by Sarah L.
For tougher stains on G1 plushies, and for cleaning giant G3 plushies, use the spray version of OxiClean, and gently scrub with a soft toothbrush. Many collectors have also had luck cleaning plushies with spray on carpet cleaners. Be sure to test an inconspicuous area for color fastness first. Always thoroughly rinse off any chemicals you apply to your pony. Dried on crusty gunk can be scrubbed at with a magic eraser.
Eyes
Model paint and Bic Vivid markers can work well for touching up scuffed eyes. Seal with a gloss glaze.
Ballerina Ponies
Dream Beauties
Star Catcher
Battery Replacement
The Sweet Talkin' Ponies' heads screw off. Inside are three batteries that are inside a compartment held together with two small screws. You can get them out once you remove the screws. You should be able to find replacement batteries at any store that sells batteries.
"You need printable transparency sheet in A4 size and suitable for your type of printer (either inkjet or laser colour printer). If you can get WATERPROOF printable transparency sheet, that is excellent as it eliminates the chance of the ink running if the wings get wet (say if you want to style the pony’s hair). Printable transparency sheet can be bought easily online (eBay or Amazon) or in a stationary shop.
There is one set of wings per PDF file, the wings will print out at the correct size.
When printing the wings out select the size A4 in the “paper size” drop down menu of the “print” menu, this means the wings will be printed out at the correct size. If in doubt, do a test print on a piece of plain paper and measure the wings, they should be the size below (depending on which wings style you are printing out)
Here are the correct sizes for each of the wing styles:
Argentina Whirly and Sun Glider and Argentina Moon Jumper and Cool Breeze = 11.77cm wide
Buzzer, Sky Dancer, Sun Glider, and Flurry = 11.5cm wide
Glow, Moon Jumper, Little Flitter and Starry Wings = 11.77cm wide
Cool Breeze. Lady Flutter, Whirly and High Flyer = 11.96cm wide"
. Argentina Whirly and Sun Glider .
. Argentina Moon Jumper and Cool Breeze .
. Buzzer . Sky Dancer . Sun Glider . Flurry . Glow . Moon Jumper .
. Little Flitter . Starry Wings . Cool Breeze . Lady Flutter . Whirly . High Flyer .
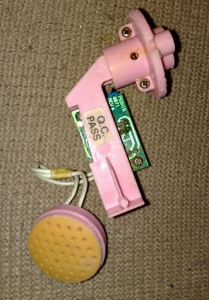
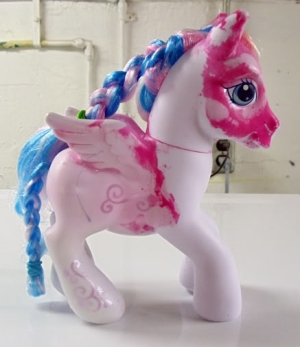
UK Princess Sparkle
If you need to repair the lights on your Princess Sparkle:
"Most fiber optics use silica monofilaments, which are pretty similar to a really heavy nylon fishing line, that sit directly over a light source. I don't have a Princess Sparkle to test, but I would pull out the old bundle of monofilament, bundle together some very short pieces of thick fishing line and stick it in there. Good luck!"
Information courtesy cookhuman. Photos courtesy Aimee T.
Paraphrased information and photo courtesy Chris R.
"I accidentally broke the head mechanism from Princess Star Gleamer, but have found a way to put the head back together. I put a needle inside the plastic and used milliput epoxy clay to sculpt a small ball on the top of the plastic and around the needle. I left it overnight to dry, and voila!! The princess is fully functional again!! You can only hear a rattle from the ball that was broken..
Shadowonthemoon provided this great tutorial and pdf's for printing your own wing replacements:
Pry the square piece off her back. Add a dab of clue and position the wing tabs, then push the square piece back into place. Some (possibly all the Windy Wings) will be more difficult to remove as they have a peg holding the square piece in place that is attached to a piece of plastic. This can be removed with needle nose pliers after you've removed the head. Photos courtesy Caroline W.